Software Serial Esp8266 Programming Mode
You have been successfully subscribed to the Notification List for this product and will therefore receive an e-mail from us when it is back in stock! For security reasons, an e-mail has been sent to you acknowledging your subscription. Please remember that this subscription will not result in you receiving any e-mail from us about anything other than the restocking of this item. If, for any reason, you would like to unsubscribe from the Notification List for this product you will find details of how to do so in the e-mail that has just been sent to you!
I have a Windows 7.0 laptop that I used to test and program the ESP8266-12E. Under “Universal Serial Bus. Get your Arduino software to support the ESP8266. I have a Windows 7.0 laptop that I used to test and program the ESP8266-12E. Caution symbol will disappear and the “CP120x USB Composite Controller” entry would have moved under “Universal Serial Bus. Unofficial list of 3rd party boards support has the information needed to get your Arduino software to support the ESP8266-E12.
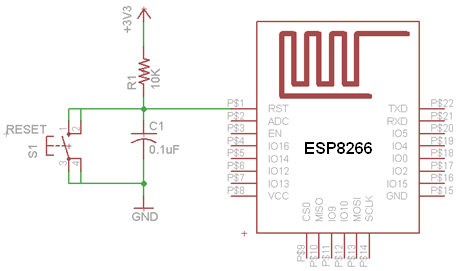
ESP8266 module is of low cost and comes pre-programmed with an AT command set firmware, meaning, you can simply hook this up to your Arduino device and get about as much WiFi-ability as a WiFi Shield offers.This module has a powerful on-board processing and storage capability that allows it to be integrated with the sensors and other application through its GPIOs. In this tutorial we can see how to get started with the ESP-01 Wi-Fi module, configure it, and verify that there is communication established between the module and another device without using a ftdi chip. Connect rx from arduino with an voltage divider to dorp from 5v to 3.3 v STEP 1: Arduino Setup First download Arduino IDE ensure that you have the latest software version (some older versions won’t work), visit the following URL: Upload Bareminimum sketch from examples to arduino this is to make sure that there are no other programs running on arduino and using serial communication channel. AT firmware is compatible with the Arduino IDE, so we are going to use this firmware for this tutorial. Connect ESP8266 as per the above circuit. • VCC shall be connected to the 3.3V power supply. • GPIO0 and GPIO2 are general purpose digital ports.
GPIO0 also controls the module mode (programming or normal operation). In our case (normal operation), it shall be connected to 3.3V (high).
GPIO2 is not used in this example. • Rx: Goes to Arduino pin0 (But needs a voltage adjusting). • CH_PD: Chip enable.
Keep it on high (3.3V) for normal operation. • RST: Reset.
Keep it on high (3.3V) for normal operation. Put it on 0V to reset the chip. Kumpulan teks lagu paduan suara gereja. • GND is ground. • Tx: Goes to Arduino pin1. ESP8266 Modes: Setup continued Open the serial monitor change the boud rate to 115200 and coose NL and CR ( new line and carrage return ).Type AT on the serial monitor you will see an OK response.If you see garbage value on the screen, try resetting the module, or checking your baud rate. Make sure the NL and CR option is set. ESP8266 module has threeoperational modes.
Each time you update your Navman GPS maps, you will have the latest and most accurate information on new roads, junctions, road rules, speed limits, safety alerts including speed cameras, school zones and red light cameras, as well as new points of interests such as sporting venues, hospitals and airports.  * Navman’s “Lifetime, Free Maps Built-in” entitles you to receive at least two and no more than four map data updates annually, when and as such updates are made available from the supplied software and Navman website. The Navman Roadmate gives you the SmartGPS experience on your iPhone.This app is designed to be a robust search tool with an extensive Point Of. $54.99 Publisher: Mitac Downloads: 166.
Access Point (AP) In AP the Wi-Fi module acts as a Wi-Fi network, or access point (hence the name), allowing other devices to connect to it. It establishes a two way communication between the ESP8266 and the device that is connected to it via Wi-Fi. Station (STA) In STA mode, the ESP-01 can connect to an AP(access point) such as the Wi-Fi network from your house. This allows any device connected to that network to communicate with the module. Both In this mode ESP-01 act as both an AP as well as in STA mode.
You can refer the following site for more ESP8266 AT command set STEP 2: Installing ESP8266 Platform First arduino environment has to be setup to make it compactable with the ESP module. It is required to have Arduino version 1.6.4 or higher in order to be able to install the ESP’s platform packages. 1.Open the preferences window from the Arduino IDE. Go to File > Preferences.